Boot Making - How to get into the craft
Share
If you are looking to get into leather boot making as a hobby, congrats on such a noble ambition! I am a couple years into learning the boot making craft now and am often asked how to figure it all out. Learning the craft of bootmaking takes alot of time and mental+physical+financial perseverance, but is also extremely satisfying every step (almost?) along the way. As much as i love shop talk and helping others directly, I thought id make it a little easier and put my thoughts down in a common spot here for anyone to pick up. Hopefully some will find this useful and become inspired, please shoot me messages anytime for further conversation!
Rather than give a literal step by step instruction of how to build a pair of boots, I'd like to share the series of stages i went through in the route to becoming capable of building boots. There are great instructions all over the internet for the various steps you will need, so i think there is more value in sharing a road map on how to build your capabilities up so that you can then build your own boots.
So i am not an expert at this. I have been passionate about learning how to make boots as a hobby for the last couple years, and have been very appreciative of the knowledge that has been passed on to me in person as well as whats been picked up online. Ive been sure to know what my own goals and limitations are, and then take in as many points of view as possible to be able to collect enough bits and pieces to form my own unique approach. Useful information can be found in the content from masters, peers, or even beginners all the same as long as you take it all in context and know what your needs are. In that spirit, heres what i got for ya...
Where to start?? There are so many unique processes and skills in boot making, its not to be seen as a singular skill learned all at once, rather we will journey through separate stages individually to build ourselves up.. Similar skill sets to draw upon and develop are going to include: textiles pattern making, general sewing, leather working, upholstery installation and wood working. If you do not have any leatherwork or upholstery work in your background, I'd strongly recommend starting out on a couple smaller projects in these areas (make a leather wallet or re-cover a stool seat with leather) before continuing to make your own boots.
Stage One - Preparations.
Know what it takes. Theres some fun to be had here even if you are just wanting to dabble.. but if your end goal is to be able to make great boots that you or anyone else can wear every day, this will take a serious commitment. You will likely need the following: a couple years of time, at very least a few thousand dollars in equipment and materials, alot of physical demand, alot of patience, alot of scrapped materials and failures, and a constant drive to be learning and improving. You can definitely make more "crafty" boots with a little less commitment and money, and have great times doing it.. but if you are going to get to the end goal then one way or another all of this is necessary. Aside from these words, do check out some youtube or insta videos of boots being made and see if that all looks like what you are into.
Basic materials you'll need. Even though i was well experienced in leather work before I even thought of making boots, there were totally different types of leathers used in boots that i didn't even know existed before. To get started on some projects, here is a list of what you'll need to gather:
- Leather for your uppers. Start with cheaper leather that you are not attached to. The leather should have a bit of stretch to it and should be 5-6oz thick, but i would recommend to use 3-4oz leather at the start because it is much easier to learn with. You can find these types of leathers anywhere and a wide range of options can be used.
heres a good Canadian place to order leather
and heres a good place to order leather for the USA
- Leather for your liners. this is like a 2oz-4oz plain leather that is really soft and stretchy. This type of leather is a little harder to find, but most shoe repair supply companies will have it available.
here is an example of good lining leather
- Leather for your insoles and heel counter. This is a heavy and hard 10+oz veg tan leather than can just be plain utility grade and should be pretty cheap. Most generic leather suppliers will have options for this.
leather like this will be ok for insoles and heel structures
- Leather for your midsoles. this is a specialized thick veg tan leather that has been hardened specifically for midsoles. I'll repeat, It is really really hard! you can buy these already pre-cut in large foot shapes, or buy it in panels and cut it yourself. Only footwear repair supply companies will sell this type of leather.
this is an example of the hard midsole leather
- Rubber for your outsole. Theres lots of brands and styles out there that you can buy from shoe repair supply companies or some specialty retail shops. look for cheap ones to start with, but i would recommend to quickly find ones you like and start getting good and comfortable working with one kind of material as different brands will not work the same with your gluing and sanding processes.
- Glue. this is not normal glue, this is not the shoe goo downtown, this isn't really even the Barge's repair glue that you may find at a shoe store. You will need some Renia contact cement or similar brand. This is really only available at shoe repair supply companies. You will also need a mask with the appropriate filters in, and other precautions to use this safely.
this is a good glue to start with
- Lasting nails. You can use some skinny hardware store nails for this or else proper lasting nails from any shoe repair supply store are quite cheap and easily available.
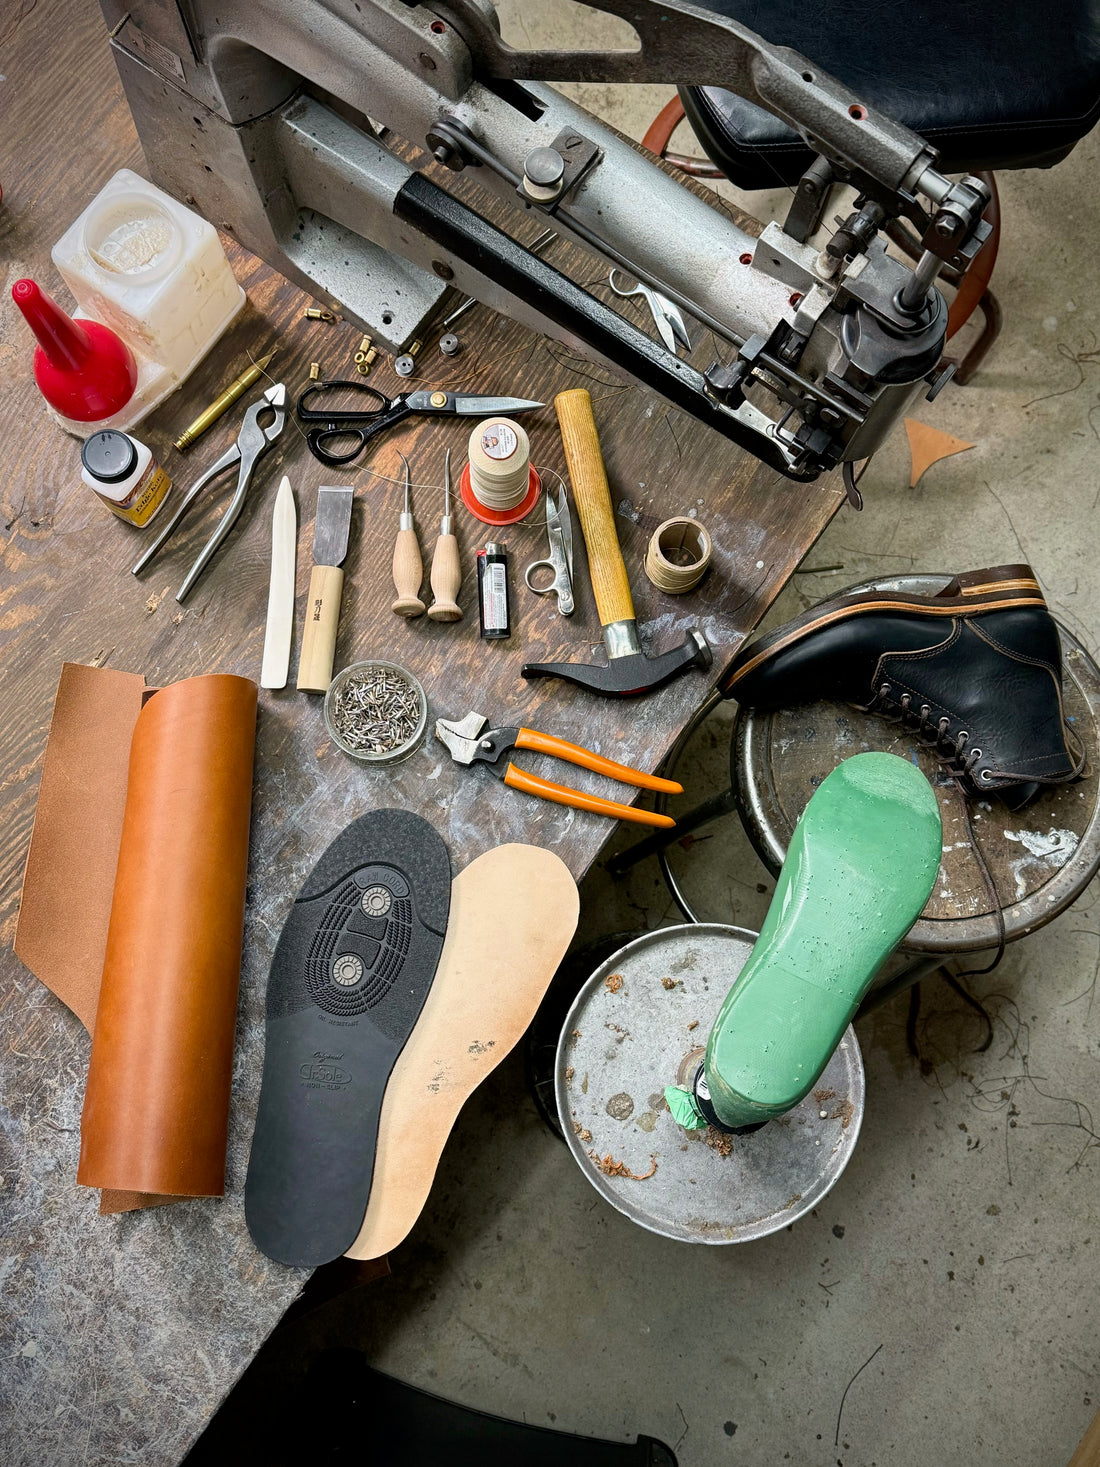
Basic Tooling you'll need. Some of the tooling required can be crossed over from standard stuff you'll find in your garage, this is just a list of the specialized tools that you will have to find:
- Lasts. These are the plastic things shaped like feet. These are probably the most important thing you will need. The entire design process and most of the assembly process is based on these lasts. Start out with one pair of lasts that are the size of whoever is gonna test your boots the most (likely this is you!). Beware that most lasts will be labelled one size smaller than what the equivalent sneaker size would be. Take time to chose a shape that you like as you are gonna be stuck with this shape for a while. When choosing a last to buy, pay attention to the shape of the toe, how high the heel drops, and how you like the general curves its got going on. Also be sure to get lasts that have a breaking hinge built into them (as a man, the closest experience to child birth I will ever have is trying, seemingly in vain and on the edge of destruction, to pull a non-hinged last out of a pair of boots in a small unventilated shed on a hot summers day). Theres lots of retail places to buy single size lasts online, but when you are ready to buy a full set of all sizes then it may be best to get in touch with suppliers in mexico or alibaba.
you can buy single pairs of lasts like this
- A sewing method. Whether its a hand punch and needles ,or an industrial sewing machine that can get through a few layers of leather, you will need a way to sew leather. If its a sewing machine, it should be a cylinder arm or post bed style machine, a traditional flat bed machine is not going to work out very well. I started out my journey with hand punching and hand sewing my boots, but then switched to a cylinder arm, my understanding is that a post bed machine would be best though.
- A stand for your last and lasting pliers. These are fairly easy to find. The most common lasting pliers have a more hooked jaw that is quite narrow, i would recommend finding the ones that have a shorter and much wider bite on them.
the wide pliers here made a big difference for me
- A way to cut the midsole leather. This leather is really really hard to cut with any hand knives, a Landis style pizza wheel hand crank cutter is a game changer to move you forward here. I used a band saw (NOT ideal) prior to getting my Landis 5in1 cutter going. These cutters are quite common on the used markets, a decent one may start around $500.
- A way to sand the sidewalls of your boots. You need a 4-6" diameter drum style sander that has 24 grit (or 40 in worst case) and 80-100 grit paper. It needs be be strong with high torque while not rotating at extreme speeds, and you need access to both the left and right side edges of the drum without obstruction. Its very challenging to get a machine set up to do this properly, there are cheaper ways to rig up very particular hardware store machines that come close to meeting the requirements, otherwise shoemaking specific brands of equipment start at a couple thousand dollars and then quickly progress to 10's of thousands. I started out with a very cheap dual head adjustable speed polishing wheel from a hardware store that i modified to with 4" diameter rubber drum sanders to replace the cloth polishing wheels. This lasted for about a year and got me through alot of progress, but it ultimately burned out and i replaced it with a proper Landis drum sanding unit.
- Awls. Depending on the construction style you choose, you will need certain kinds of awls to poke and sew through the midsoles to attach the uppers. George Barnsley has by far the best tools and widest selection for everything you will need.
yea these guys are good and no worries shipping to north america
- A hand skiver. Its not absolutely necessary but there are a few different parts of the assembly that will be helped out alot if you can skive the edges of your leather thinner. I like the Japanese style forward pushing hand skivers the best.
this is my favourite but theres cheap ones on amazon too
Stage Two - Basic Design.
OK now we are getting closer to actually doing something!
To start the design process out, just look at lots and lots of boot pictures online and get a feel for the basic style (derby service boot is a good basic starting point) and the more subtle design cues (how high you want them, the angle of the cuff, the shape of the derby curve, the design of the heel cover, etc) that you like. Its best to minimize complications and start with a plain toe, then its not too hard to incorporate a moc toe or cap toe later on.
You are also going to have to research the construction style options for attaching the soles. Without expensive machines you are kind of limited to a "stitch down" construction or a Hand Welted construction, and then a 360 stitch or a nail down heel. There are implications in your pattern design to the positioning of the vamp and heel cover depending on what construction method you are using, so you gotta have this in the back of your head as you are designing your pattern.
Making the pattern. Look up YouTube videos on how to do the masking tape on lasts method for pattern making. Most the videos kind of bumble through it, and you probably will too, but its ok. Its a bit difficult to flatten the sections of masking tape onto flat paper after you remove them from the last, using a bone folder to spread the tape evenly helps a bunch. Give priority to having the top edges and sewn edges sitting as flat as possible, dont worry about the bottom edge as much.
At this time you also have to figure out your strategy for the liner layers. Some pieces of the liner may be 1:1 to the outer, like the vamp usually is. Other pieces of the liner may be combinations of 2 outter pieces, or else a totally different configuration. It may help to get your hands on actual pairs of boots and look inside them to see the different approaches they take. Typically you are going to need to have the whole perimeter of the bottom of the boot having two layers in order to make the assembly work.
Once you have all your pieces mapped on the paper you just have to add the appropriate seam allowances for your sewing method and away you go!
When you are making your patterns, expect that you will have to re-adjust them many times to get them just right for assembly. As nice as your sewn pattern looks, theres a moment of truth when you try to stretch it onto the last. For me, the shape of the seamed edges on the vamp was the thing i had to keep tweaking, little changes to the angle of the "wings" and how far they fan out made a big difference in getting the pattern to behave on the last.
You can also skip all of this and buy a generic pattern off the internet, but depending on your lasts it still may need some amount of adjustments to get it to work right.
Getting the pattern for the uppers together is definitely the biggest part of the design, but at this point you should also figure out what your sole is going to look like. The height of the heel drop on your last is important here as it dictates the heel height, heel stacking, and any wedged layers in the midsole that you may need to make your choice work. Basic styles of soles to start with though would be a complete full sole (full coverage rubber piece with heel built into it), or a full sole with a leather heel stack, or a wedge style full sole. Half soles are also an option but may be a little too fancy to try and start out with.
Stage Three - Make something!
Sewing the Uppers. Alright just grab some cheap leather and start cutting and sewing your newly designed uppers! at this point you should fully be expecting your first attempt to be a "learning experience" so do not get too attached to the product and rather be all eyes and ears on the process. Sewing the uppers is basically the same as any other textiles sewing project. It helps alot to glue all your seams before sewing, and you will have to sort out the right order to attach each piece in depending on your pattern so that you do not paint yourself into a corner.
Once you are done sewing the uppers, you can grab a last and cut a leather insole out that matches the bottom of the last, make sure it is finished smooth and exactly matches the bottom edges of the last. This thick leather insole actually becomes the bottom of the last, so any bumps or dips in its cut will translate to the outside of your finished boot at the welt area.
Lasting your boot. To me this is the essentially the heart of the hand made boot process, its also really hard and frustrating to learn! Watch lots of videos on this, both the instructional videos and the fancied up social media shots are really helpful if you look closely. Some helpful hints and tricks for me were:
- using the wide mouth lasting pliers (wider so they dont rip, and also you can flip them over and pull them in the other direction too).
- learning to feel the leather so you pull just to the point of all the stretch being gone but not far enough to rip.
- getting a good sequence of which parts of the boot to pull and nail first and which parts to pull harder on. I find im not pulling as hard at the few nails around the tip, and then increasing to pull the hardest at the ball of the foot.
- getting good at managing and distributing the folds when lasting and learning to get the right amount of slack into each fold without resulting in a wrinkle bump spreading up to the visible part of the boot
The area on the middle front of the foot just below the laces is likely going to be the hardest spot to get to properly fit on the last, if this doesnt go tight then its not right. For me it was a combination of tweaking the patterns and improving my lasting techniques that eventually got that little baggy section to stretch out and conform to the beautiful curves of the last.
If you need it, using softer leather or thinner leather are good ways to cheat it a bit to get your confidence up and then move on to the real stuff. Also you can just last and then unlast the same boot over and over for practice and it will stretch more and get a little easier each time.
Depending on the construction method you used, you will also have decisions now for adding a shank and cork to the boot before closing it up with a midsole. Any boot with a heel should have a shank.
At this point your project has taken the shape of a boot so it is pretty exciting, though with the leather tucked under and no bottom attached it will kind of also look like something between a ballerina and soccer shoe.
Attaching the mid sole. Similar to the lasting step, this is a technique that is purely unique to shoe and boot making. Once you've picked your construction style then follow some online tutorials to figure it all out. Also like the lasting step, this is a very physical process that takes alot of skill, so be ready to take some time here to get things right. With the midsole attached your project will be looking alot more like a boot and its very exciting at this stage as you can start setting it on top of the outsoles and heel stacks and really get a preview of the finished product.
Attaching the out soles. Now we are just carefully gluing, aligning, and attaching the layers of the outsole. Here your gluing technique is really important for the longevity of the boot. Best gluing tips are to always have fresh runny glue, do two smooth thin layers of glue without any blobs or pile ups, and always make sure it is fully cured before touching together. Having the Landis 5in1 to roll around the edges and some kind of sole press to compress the whole layer together also really helps out here, otherwise you can get smooth hammerhead shaped pliers to pinch around the outside and then just hammer the rest of it down really good. Theres a couple standard ways to attach the outsole really well but also in a way that is repairable in the future; you can sew through a thin rubber layer on the bottom of the leather midsole to allow for a rubber to rubber glue connection of the outsole, or you can glue your outsole direct to the leather midsole and sew right through all the sole layers.
Attaching the heel. If you have heel stacks then you should put clinch nails through the stack and have them cliched off at the surface of the insole inside the boot (kinda sounds crazy to have nails there but thats how it works!). Then glue the rubber on the heels and put little nails in the rubber to help hold it on the heel stack.
Sanding the sidewall of the sole layers. This is kinda like woodworking and that drum sander with extra heavy grit paper is really the only thing that will do this job right. You’ll also learn to pre-trim your layers as much as possible so you minimize the work on the sander. It will take a while to get over worrying about the fact that the nice upper leather on your beautiful boots is only a millimeter or two away from the sanding wheel as you have to maneuver the boot around at awkward angles. You will probably also eventually push a knuckle into the rough sanding wheel and not forget about it for a few weeks.
The finishing touches. There’s steps throughout the build where it makes most sense to bevel edges or sand or wax or burnish certain pieces, everyone can figure their own thing for this though and how far they want to take it. The side walls of the soles should definitely get some kind of coating though. Resolene is very common, I prefer edge-kote for this task though. Regardless of what you use, similar to the glue you want to do multiple really thin coats and let each layer dry properly.
You made a boot! (?). Whatever you have made, it’s great. It’s full of accomplishments and failures, both equally valuable to your future progress. Sit back and relax, maybe put them on, take your first steps, you got it made!
Stage Four - Find your groove.
Yes, we are talking about practice here. Keep making more boots. Each pair should have a purpose, a couple elements that you have planned to improve in advance while taking notes in process on what’s gonna be on the improvement list for the next build. Maybe theres more than a couple things you still dont like about your boots, but leave some on the backburner for now and just prioritize a few incremental improvements each time.
you are going to be acquiring new tools, techniques, and maybe more equipment during these builds. Once you have done a build or two then some of those cool workshop videos on instagram start making a lot more sense and you pick up on the subtle details they offer.
Every step that feels difficult, stressful, insufficient, or slow is an opportunity. So appreciate when these things show themselves and trust that there’s always a better way to be found, then find it! Usually there is an easy solution but it will be a specialized machine that costs thousands of dollars, but often there are hack solutions to still get you there.
You should also be wearing your boots a lot in different situations to understand how they fit and feel and how well they hold together. When you feel good enough, get them on other people’s feet too and you will probably find a few other tweaks to improve the fit.
Your standards will keep getting higher every build, things you never noticed before will now stand out like a sore thumb. Eventually you’ll take care of enough of these opportunities that the long steep climb of the learning curve will flatten out a bit and turn to a nice rising stroll. Also keep in mind that most expensive handmade boots that you would find in a store will still have some tolerance for noticeable variance, so always strive for perfection but there is a limit to stay sane as well.
you can make a decent boot for yourself now and that’s really something to be proud of.
Stage Five - Master this thing.
you are in the drivers seat now. Maybe you are happy being able to make boots for yourself whenever you feel like it, or maybe you wanna go further..
You’ve put in most of the hard work now, so why not take more advantage of it. Try some more variants of your designs or different styles; add a moc toe, add a cap toe, go higher, go lower. Get more sizes of lasts and try scaling your patterns. Take your confidence and use some more expensive leathers. Add some signature touches to your patterns or your stitching to create your own identity.
Stage Six - Pass it on.
Once you've taken the first step down this path, you are one step ahead of most folks. Pretty much every tip or trick you learn is worth sharing, and often becomes a future positive one way or another. In most cases we are all alone in a workshop somewhere trying to make sense of it all, so take value in those rare moments face to face or screen where theres opportunity to help each other out.
Stage Seven - Conclusion.
This is the first blog i've written. I thought best to start with this overview of my path so far, and i hope its found as a helpful compliment to others' efforts. Please reach out with a shop talk message any time. I hope to add some new blogs that have more specific focuses related to boots and bootmaking soon.
Thanks and good luck!